Hours 90
Total Hours 1334
Lets get started on my 2 weeks off starting Oct 1.
I mounted my new Desser Monster Retreads on my new Grove Wheels. The tire and wheel on the right came with my project and was well used. someone probably decided to swap out the kits new wheels and brakes for their old ones. The kit was missing a brake caliper and several other parts so I was better off buying new Grove brakes and wheels.
I hand packed the wheel bearings with Aeroshell 5 grease.
New tires and brakes mounted. Also ran the 1/4" brake lines as per Vans plans.
Brake lines connected to firewall.
I then put on the gear and wheel fairings. These were already put together by the previous builder when the plane was a 7A nose gear model. The gear fairings are a little short for the 7 plans but will work. I raised the tail to put the plane in level position.
I had to change out the nutplates on the brackets where he installed #6 nutplates instead of #8.
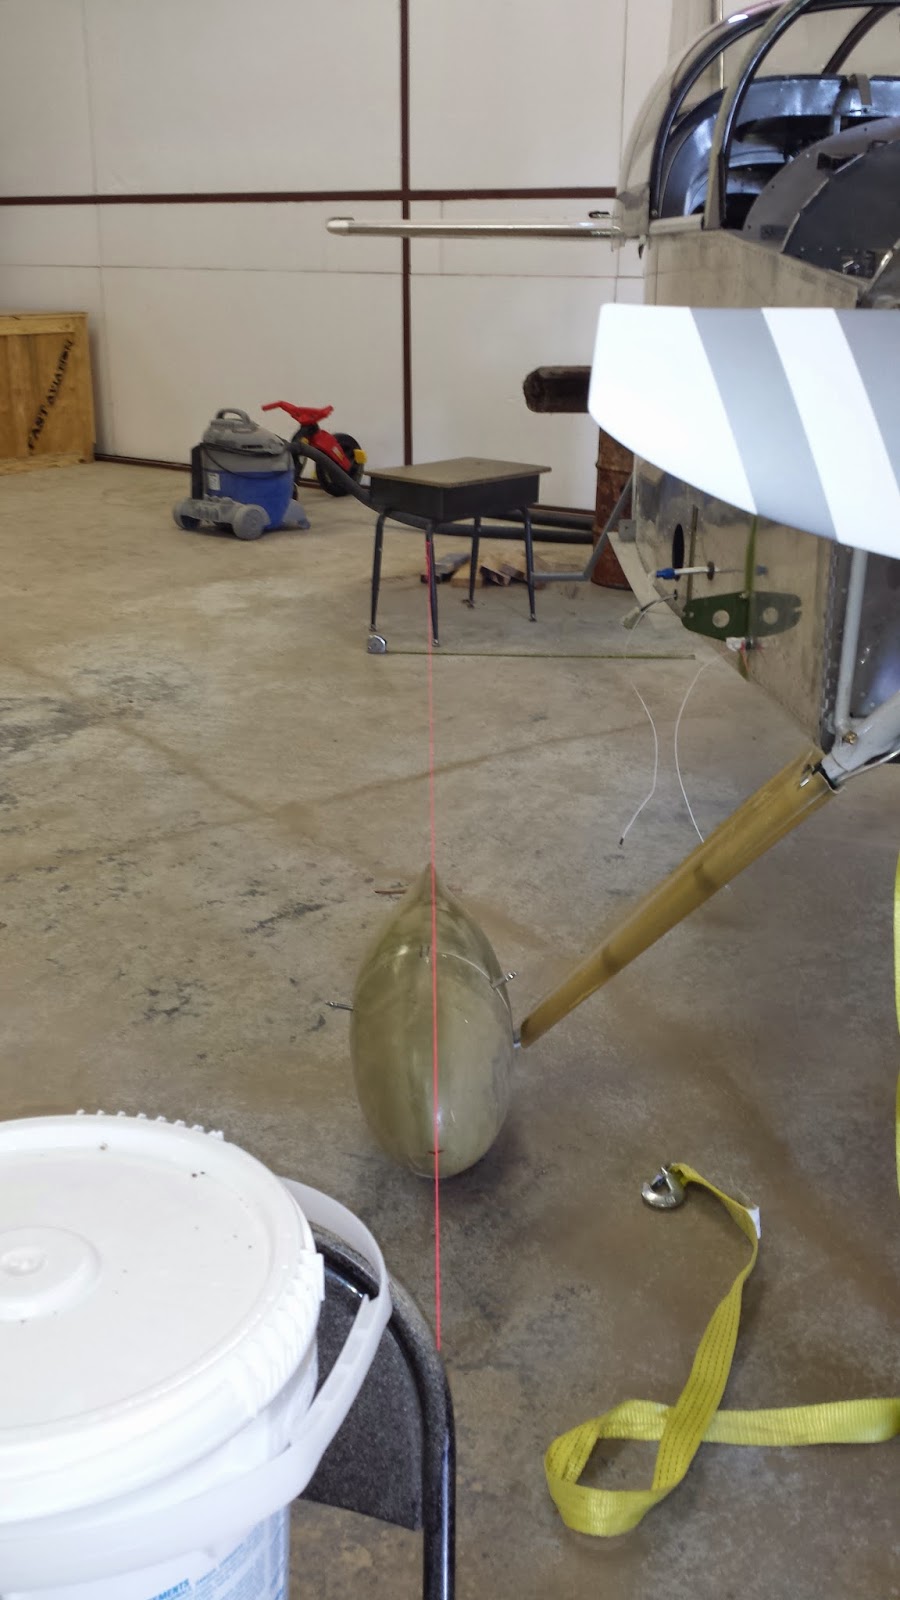
I built a stand to raise the tail of the pants 8 5/8" high as per Vans plans..
I hung plum bobs from the center of the plane in the front and back and snapped a center chalk line underneath the plane. I then proceeded to align the gear fairings by running a string parallel to the chalk line to simulate airflow. I then installed the SS worm gear clamps on the upper portion of the fairings securing them to the gear legs.
Another pic of the gear fairing alignment.
I then lined up the wheel pants. The I drilled the mounting holes in the wheelpants.
Another pic of lining up the wheel pants.
The pants did not mate up well with the brackets and the FB would soon crack out if something wasn't done to support it. After getting the pant/bracket holes drilled, I layed up 6 layers of 8 oz cloth to reinforce the pant/bracket mating areas. After that cured and the holes were redrilled,I applied a a layer of flox epoxy mixture with 1 piece of FG cloth on top and let it cure a while. Then I put packaging tape on the brackets, remounted the pants, waxed and put in the mounting screws.
After they cured, I pulled them off and this is what they looked like.
The layer of flox and cloth conformed to the pant and provided a strong
level mating point of the pants and brackets. I ground off the excesses
flox later.
The I decided to deal with the uneven gap between my spinner and cowl. I
decided I wanted 1/4" gap all around. I mounted the cowl and drilled holes
thru tounge depressor sticks and gauged 1/4" all around the cowl halves.
The pics below will show this. Then I cut a 14" circle out of an old
piece of Formica counter top I had laying around. I waxed the formica
side with mold release wax.
Then I mixed up a large batch of micro with some cabosil and applied it to the cowl halves.
I put the circle down on the top and pushed it down until it rested on the tongue depressor sticks. the excess micro oozed out the sides.
After it cured, I took off the circle and found a nice flat surface all around that created a perfect 1/4" gap between the spinner and cowl. I will epoxy one layer of cloth on this for strength and finish filling and sanding it to look good.
I then mounted the intersection fairings by drilling them on, marking the center line and cutting them in half. Then I reassembled them and epoxied them to the pants.
It's looking nice but these have a lot of finish work ahead of them.
I installed the upper fairings I bought from Vans. They fit well but I couldn't figure out how to hide the mounting screws. Oh well, cant have everything.
I the shifted gears and went to work on the lower outboard wing skins. This C dimpler came with the tools I bought from another builder and this was the first time I got to use it. it worked very well dimpling the skins.
As I got to the outer edges riveting the skins on, things got easier but the earlier bays almost killed me! Riveting with one arm on the outside while reaching up to the rear spar and bucking the rivets was tough! I woke up the next morning with black and blue arms and feeling like a truck ran over me. The second skin was much easier and I had learned many new tricks.
After the skins were finished, I installed the wings and temp installed the wingtips and turned on the position lights. Strobes worked good as I turned the hanger lights out and took this pic. Its looking good!
I layed up a FG flange for the transition fairings on the wheel pants.
Installed the flaps.
I installed some heat shields I had purchased getting ready for the first engine start. I finished clamping a few wiring runs on the engine and behind the panel and clecoed on the forward upper skin. I went to the airport in Big Springs and bought 25 gallons of 100LL Av Gas. 5.95 per gal, OUCH! I brought it home and filled each fuel tank calibrating the Dynon sensors as I went. I emptied each tank while testing the boost pump to 48 gph at the servo connection. I filtered the gas as I put in about 6 gal in each tank. I then tested the fuel flow at the fuel divider with the throttle wide open and full rich, 3.8 gph. I pullled the mixture to ICO and the flow stopped. This confirmed my throttle and mixture controls were correctly installed so far. No leaks or glitches so far!

After checking everything I could think of or research, I charged the battery good and pushed the plane outside. I tied the tail down to the bottom of my John Deere tractor loader with a 2" wide tow strap. My wife came home from work and I gathered a couple of neighbors to help. After one last look around, I climbed in the plane and booted up the Dynons. I hit the starter for about 15 seconds several times with the mixture off until the oil pressure came up. I then pushed in the mixture and cracked the throttle. I never turned on the boost pump but the pre oiling had the fuel psi gauge coming up so I hit the starter and the engine started on about the forth blade! I ran for a moment then died. I restarted and it ran great at about 1000 RPM. I ran it for about 30 seconds and then shut it down and checked for leaks. I had a very small amount of gas escaping the weep hole in the top of the fuel divider. It was decided that it might be a diaphragm in the divider that had been dry for a long time. I tapped a little on the divider and when I started the engine again, the leaking stopped. I will keep a close eyed on this on later engine starts. After about 5 runs including one up to 1800 RPM when I checked the mags and cycled the prop, I found no issues. The engine ran great at all speeds and oil psi was normal. Alt charged good and all my sensors worked. And much to my delight, my headphones and comm with the radio on, were completely silent with the engine running! No radio noise! I don't think I have ever flown a plane without some engine noise or whine in the headphones!
Needless to say, I am very thrilled! I have been working toward this day ever since I bought this used engine over a year ago. After changing the sump, rerouting the fuel injection system, installing and re timing the mags, I was a little worried if it would run. My controls turned out great also, the engine idles a little slow at 550 rpm but other than that, everything is fine. Here is a video above. I edited out a lot of the pauses and checks to get the file size down.

I put everything back on and pushed it back in the hanger. I worked about 90 hrs and this months progress was great! I forgot to mention, yesterday on October 14, before I started the engine for the first time, I mailed off my registration papers to the FAA. On my next days off I will team up with my wife, Nancy, and get the top forward panel riveted up. (I better stock up on Advil) Also install the wingtips with the piano hinge method. Maybe start the windscreen installation, and of coarse, more work on the fiberglass parts getting ready for paint.